The contents of this article are solely my own work. You are welcome to share, reuse and incorporate it’s contents in other publications so long as due credit is provided.
Overview
Producing a comprehensive security report at the end of each month is one of the expectations of any good security team.
One data that is useful for reporting is the number and types of alerts from the previous month. This report provides a good picture to the management as to which resources may require extra attention.
Request summary
Produce an automated sentinel alert report showing all alerts from the month before, generated monthly and emailed to specified users
A security analyst can KQL to extract the total number of alerts via Azure Resource Graph directly, then download a .csv file containing the information.
If the security team is using Azure Sentinel then this data is also sent to a Log Analytics workspace and a report can subsequently be generated from the workspace by running KQL queries.
The cloud team can make life easier for the security engineers by automating this process using the power of Azure Logic Apps.
The reports will be automatically generated once a month and saved in an Azure File share. An email will then be sent to the team on a monthly basis with the link to the file share and a csv attachment containing the report.
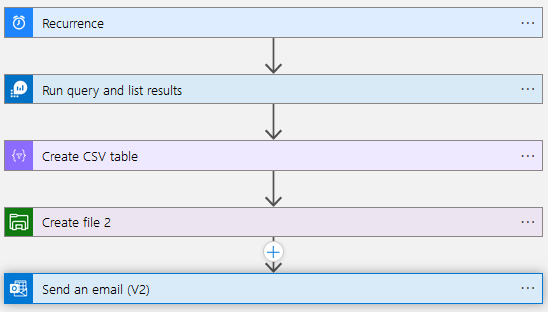
Below is the overview of the logic app from the logic app designer perspective:
Requirements
We need the following resources to be able to successfully automate the process:
- Azure Logic App instance on the consumption tier
- An Azure service principal (Entra app registration) with access to the subscription. We will use this to connect the logic app to other resources below
- Azure Sentinel Instance
- Azure storage account with SMB File share. In this demonstration we create a folder within the share to save the files named sentinel-alert-reports
- A shared MS365 email account used for sending the monthly emails. In this scenario I will be using my own account.
Configure Automation
Start by creating a logic app in the consumption tier and proceed to the Logic App Designer.
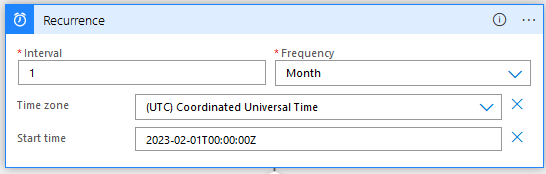
Add a recurrence trigger to kick off the flow as below. This will ensure the logic app would run on a monthly basis.
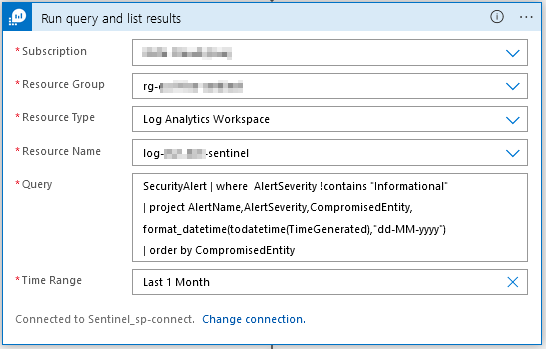
The second step is to run the query on the Sentinel workspace. Add an action block ‘Run Query and list results‘. This is where you will be prompted to connect your logic app to the workspace using the app registration details.
After the connection is successfully established, connect to your sentinel workspace and enter the query below:
SecurityAlert
| where AlertSeverity !contains "Informational"
| summarize by AlertName, AlertSeverity, CompromisedEntity, TimeGenerated
| project CompromisedEntity, AlertName, AlertSeverity, format_datetime(todatetime(TimeGenerated),"dd-MM-yyyy")
| order by AlertSeverity
The code above will list all the non-informational security alerts and order them by the severity.
You can expand the query further as you wish, for instance add a separate column showing how many times a compromised entity has been affected. The result should look something like this:
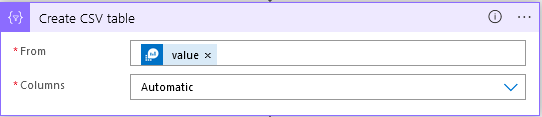
Next add a new action block to create a csv table from the generated results. Add the ‘Value’ from the dynamically generated output of the previous action block.
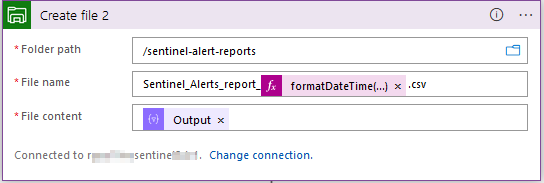
Next, create a File storage block and add ‘Create File‘ action.

You will be prompted to connect to your storage account. Subsequent values for the folder path will be dynamically generated and available for use. You can select the path created earlier as the location to save the monthly reports.
Choose a meaningful name for the file and use the time function formatDateTime(utcNow(), ‘dd-MM-yyyy’) to generate date and time which will be appended to the file name. Be sure to add the .csv in the file name.
For the file content you can use the output from the previous action block.
The final completed block should look like this:
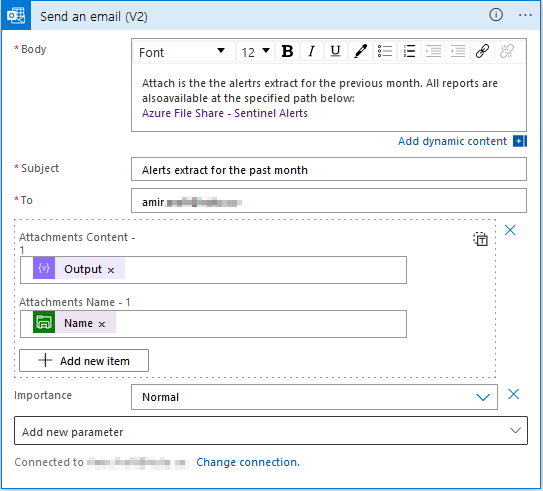
Last step is to add the email action. Choose Office 365 outlook block and add the ‘Send email‘ action. This is where you can use the shared email credentials to connect to the email account which will be sending the emails.
Add the attachments fields and a link to the file share. The email will contain the latest report as well as a link to the fileshare for all the previous reports.
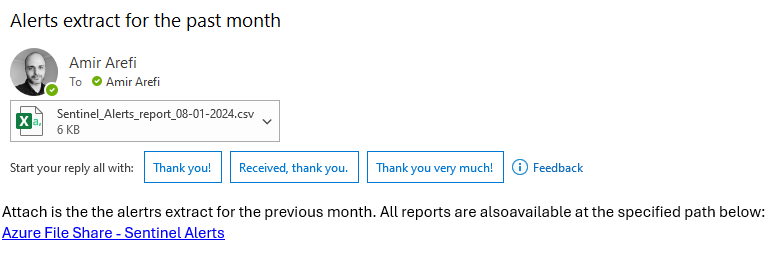
Results
Now we can do a test run by running the trigger manually, which should send us an email with a csv attachment.
That’s all, thanks for reading this guide. Logic Apps are incredibly useful with automation of routine tasks. I hope this guide can help someone out there to work more efficiently.

You must be logged in to post a comment.