
- Overview
- Requirements
- Configure The Environment – Azure
- Configure The Environment – Azure DevOps
- Set up the CI/CD Process
- Final Words
The contents of this article are solely my own work. You are welcome to share, reuse and incorporate it’s contents in other publications so long as due credit is provided.
Overview
In one of the previous articles I discussed the creation and deployment of a simple containerized Python flask app to an AKS cluster.
As part of the build described above, we had to deploy an Azure Kubernetes cluster using Terraform but from the desktop. In this article, I will be using CI/CD methodology and a few tweaks to the terraform code to fully automate the AKS creation process. We will start to build and thus be able to maintain the Infrastructure as Code.
We will also use security monitoring extension to monitor the code for potential security issues before it can be deployed to the environment.
Initially I will be setting up the Azure and the Azure Devops environments for the CI/CD flow and then will dive deeper into the pipelines and the terraform code.
I would make the effort in this article to outline each step in detail however, a certain understanding of DevOps methodologies is still required to fully understand the processes.
Requirements
Azure Storage Account and a blob container , this container is needed to store the terraform state files for the project.
Azure service principal This will basically be the app registration created for Azure Devops and Terraform to authenticate to Azure and build our resources (via a service connection). Once the application is created, we will provide the necessary permissions using the application object.
Azure DevOps account, we will be using the MS free hosted agents.
Configure The Environment – Azure
On the Azure side, we only need to create a service principal to link Azure to Devops using a service connection as well as a blob storage to hold the terraform state file.
Create an App Registration
Create a Microsoft Entra application registration in Azure and add a secret. Take note of the App ID, Tenant ID and the secret. We will later use these values to integrate DevOps with Azure using a service connection.
By creating an app registration we’re effectively creating a service principal that is also associated with an application object. We can then use this application object to assign the necessary roles or permissions.

Create the Storage Account and the Container
Create the storage account and the blob container which will hold the terraform state files.

The container can remain private (no anonymous access) as we will later integrate DevOps and Azure using a service connection.
Assign permissions
Now we need to assign the appropriate permissions to Azure resources for the app object associated with the service principal that we created earlier. To keep things simple, we’re assigning the ‘contributor’ role on the subscription level to the app.

Configure The Environment – Azure DevOps
To allow Azure DevOps pipelines to access resources in Azure we need to first add a service connection. We can do so using the service principal created in the previous step (app registration).
We also need to set up the plan and build pipeline environments and add Terraform and Tfsec extensions needed for the project.
Add the Service Connection
Create a project in Azure DevOps and choose ‘Git‘ for version control. Under Project Settings–> Service connections , add a new service connection and select ‘Azure Resource Manager” and proceed with ‘Service principal (manual)‘ as the authentication method.
Now we can add the service principal details obtained in the previous step into the fields, verify the connection and save.

To allow our pipelines to use this service connection we can ticket the box ‘Grant access permission to all pipelines‘. We can also grant this permission to specific pipelines if required for security.
Add the Required Extensions
At a bare minimum we need the terraform extension for this project. However we will also use the tfsec extension to help with detecting potential security issues in our terraform code.
From the overarching DevOps organisation –> Organization Settings–> Extensions add the Terraform extension provided by Microsoft DevLabs via the DevOps marketplace.

Add the Pipeline Environments
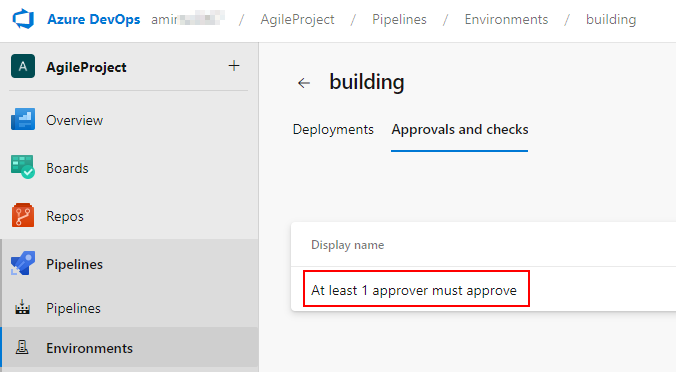
Go to the project created earlier and select Pipelines–>Environments. Create two environments called ‘building‘ and ‘planning‘.

Once the two environments are creating we need to add an approval check to the ‘building‘ environment to prevent our terraform pipelines to proceed to the build stage without approval. This is a crucial safety check in any production environments.
Set up and Enable the Agent Pools
To keep things simple we will be using Microsoft hosted agent pools. This step is to ensure the agent pool is correctly set up and enabled. Take note of pool name as we will be referring to the agent pool later in the pipelines.

Set up the CI/CD Process
In this step we will be adding the repo and the pipelines and later trigger the build.
Once the code is ready we can push it to our repository in Azure DevOps and create a pipeline to trigger the build.
In this demonstration we will be adding the pipeline yaml files to the version controlled repository and use them to create our pipelines.
Repository Setup
Below is the folder structure for the project once the files are pushed to the repository:
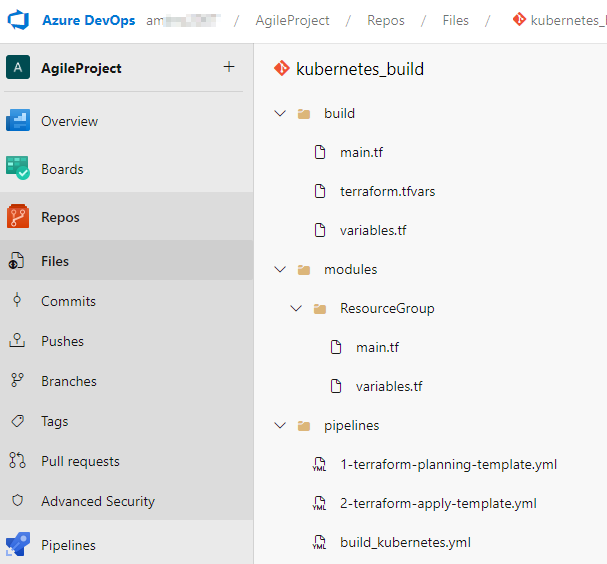
It is good practice to use terraform modules as much as possible and import them into the main build. One of the biggest benefits of modules in Terraform is reduced duplication and increased maintainability of the code. You can read more about modules and their benefits on Hashicorp’s website.
In this case we are only adding the resource group as a module in our terraform code, this is mainly for demonstration purposes. In production scenarios more likely than not, the Kubernetes Cluster should also be configured and called in as a module.
We’re also declaring the ‘location‘ and ‘resource group name‘ as variables and assigning values in the terraform.tfvars file within the build folder.
Terraform
With everything else in place the main.tf file is shown below.
It should be noted that best practice dictates all variables to be declared and added in the tfvars file, this could include the cluster name, node pool values and network profile values. For the purposes of this article I’ve tried to keep the code as similar to the one in the original article as possible while at the same time demonstrate the use of variables in terraform.
provider "azurerm" {
  features {}
}

terraform {
  backend "azurerm" {}
}

module "ResourceGroup" {
  source = "../modules/ResourceGroup"
  location = var.location
  resource_group_name = var.resource_group_name
}

resource "azurerm_kubernetes_cluster" "Test_WebApp" {
  name                = "Test_WebApp"
  location            = var.location
  resource_group_name = var.resource_group_name
  dns_prefix          = "testwebapp-dns"
  depends_on = [ module.ResourceGroup ]

  default_node_pool {
    name       = "linux"
    node_count = 1
    vm_size    = "Standard_B2s"
    os_sku     = "Ubuntu"
  }

  identity {
    type = "SystemAssigned"
  }

  tags = {
    Environment = "test"
  }

  local_account_disabled = false

  network_profile {
    network_plugin     = "kubenet"
    dns_service_ip     = "10.0.0.10"
    docker_bridge_cidr = "172.17.0.1/16"
    outbound_type      = "loadBalancer"
    pod_cidr           = "10.244.0.0/16"
    service_cidr       = "10.0.0.0/16"
    load_balancer_profile {
      managed_outbound_ip_count = 1
      idle_timeout_in_minutes   = 4
    }
  }
}
As we can see the main difference here is the removal of the full backend delcaration in the code. In fact the only declaration we need is to let terraform know it can find it in Azure by stating the below:
terraform {
backend “azurerm” {}
}
We can later see how we can use pipeline parameters to feed the backend information into pipeline.
Another little difference in the code is the addition of:
depends_on = [ module.ResourceGroup ]
It can sometimes take a few seconds to build the resource group needed to build the cluster. This line is to ensure the code does not continue to the AKS build step until the resource group is created otherwise this can result in a failed pipeline run.
Pipelines
This project consists of three pipelines listed below:
- Planning pipeline
- Apply pipeline
- Project/build pipeline (AKS cluster build)
The planning and apply pipelines are used as templates that are called in via separate stages within the main project pipeline.
There are great resources on the web where the concept of plan and build pipeline templates is fully explained and similar templates can be downloaded. In this article I will only share and discuss the main build pipeline.
Below is the main build pipeline that consists of a ‘plan‘ and ‘apply‘ stage that each would call in their respective templates described above.
We can see the backed information are defined as parameters which can be changed each time the pipleline is run. This is where we can add the storage account and blob information that hold the TF state files.
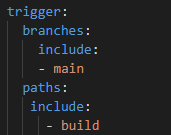
trigger:
  branches:
    include:
    - main
  paths:
   include:
     - build

pool: "Azure Pipelines"

#This is where the parameters are passed to the pipeline at the time of running as opposed to having to declare them within the terraform project.
parameters:
- name: terraform_version
  default: '1.5.0'
- name: terraform_backend_service_arm
  default: 'Azure subscription 1'
- name: terraform_backend_resource_group
  default: 'testkubernetes'
- name: terraform_backend_storage_account
  default: 'amirtestterraform'
- name: terraform_backend_storage_container
  default: 'terraform-state-files'
- name: terraform_state_key # Edit this per pipeline
  default: 'kubernetes_build.tfstate'
- name: git_working_directory
  default: /build/

stages:
- stage: 'PlanStage'
  displayName: 'Planning Stage'
  jobs:
  - deployment: PlanDeployment
    displayName: 'Planning Changes'
    environment: 'planning'
    strategy:
      runOnce:
        deploy:
          steps:
          - template: /pipelines/1-terraform-planning-template.yml  # Run the Planning Template
            parameters:
                terraform_version: ${{ parameters.terraform_version }}
                terraform_backend_service_arm: ${{ parameters.terraform_backend_service_arm }}
                terraform_backend_resource_group: ${{ parameters.terraform_backend_resource_group }}
                terraform_backend_storage_account: ${{ parameters.terraform_backend_storage_account }}
                terraform_backend_storage_container: ${{ parameters.terraform_backend_storage_container }}
                terraform_state_key: ${{ parameters.terraform_state_key }}
                git_working_directory: ${{ parameters.git_working_directory }}

- stage: 'ApplyStage'
  dependsOn: PlanStage
  condition: and(succeeded(), eq(variables['Build.SourceBranch'], 'refs/heads/main'), eq(dependencies.PlanStage.outputs['PlanDeployment.PlanDeployment.terraformPlanResult.terraformChanges'], 'true'))
  variables:
    varFromPlanStage: $[stageDependencies.PlanStage.PlanDeployment.outputs['PlanDeployment.terraformPlanResult.terraformChanges']]
  displayName: 'Applying Stage'
  jobs:
  - deployment: ApplyDeployment
    displayName: 'Applying Changes'
    environment: 'building'
    strategy:
      runOnce:
        deploy:
          steps:
            - template: /pipelines/2-terraform-apply-template.yml  # Run the Apply Template
              parameters:
                  terraform_version: ${{ parameters.terraform_version }}
                  terraform_backend_service_arm: ${{ parameters.terraform_backend_service_arm }}
                  terraform_backend_resource_group: ${{ parameters.terraform_backend_resource_group }}
                  terraform_backend_storage_account: ${{ parameters.terraform_backend_storage_account }}
                  terraform_backend_storage_container: ${{ parameters.terraform_backend_storage_container }}
                  terraform_state_key: ${{ parameters.terraform_state_key }}
                  git_working_directory: ${{ parameters.git_working_directory }}
We can also see the use of environments in the pipeline. This is where we use the previously created environment values to add ‘approval‘ checks to the build. So in this case, once the pipeline is ready to proceed to the ‘applying’ stage which is within the ‘building‘ environment, it would await approval before proceeding. The approval request is sent automatically via email to the define recipients.

Once we have the yaml files in place and added to the repository, we can create the pipelines in Azure DevOps using the existing yaml files.
From the project go to Pipelines–>New Pipeline–>Azure Repos Git–>Select your repo–>Existing Azure Pipelines YAML File

We only need to create a pipeline for the main build.

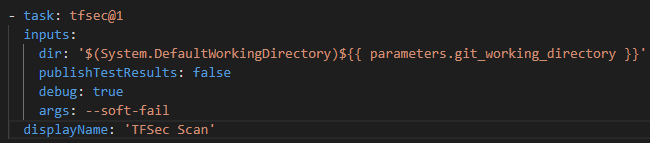
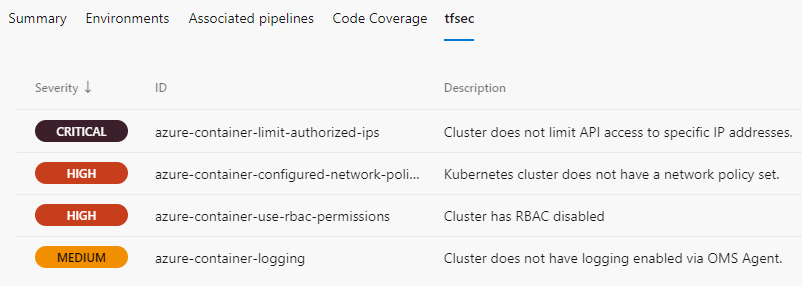
Our planning pipeline template also includes a tfsec task (we added the extension earlier) that can check for any potential security issues with our build. We will later see the results of the scan on our pipeline.
Trigger the Build
As per the yaml above, the pipeline will trigger on any changes within the ‘build‘ folder done on the main branch.
At this point we can create a new Git branch within VSCode, add a change i.e a new resource group name within the terraform.tfvars and push to the Azure DevOps repo. We can initiate a pull request to merge our branch into the main branch thus triggering the pipeline and marking a full CI/CD cycle.
Create a branch–>make & commit the changes–>push–>create a pull request–>pipeline is triggered.
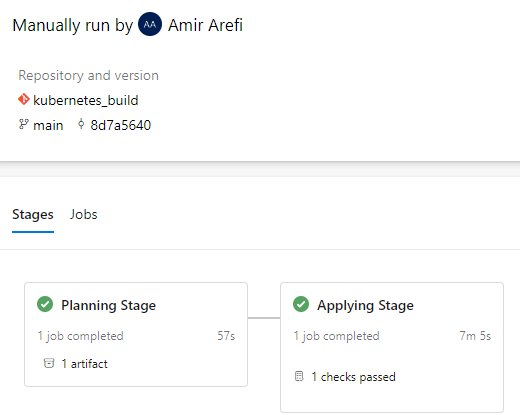
Below is a screenshot showing a successful run of the pipeline with a focus on the planning stage showing the cluster to be built in Azure.

tfsec task within the planning pipeline has also found a few serious issues with our build that would need attention. In production environments this information can be extremely valuable for obvious reasons and can help a potential reviewer in deciding whether to approve or deny the pipeline before it gets to the ‘applying‘ stage.
As this is a demonstration scenario, I have approved the planning stage to proceed to the ‘Applying’ stage.
After about seven minutes we can see both stages completed successfully and our resources including the AKS cluster appear in Azure.
Final Words
Thank you for taking the time to read this article. I have to emphasize that this article is by no means intended to be comprehensive. I had to skip some steps in between to avoid making this into a long and boring essay (I might have already failed on that task). Having said that, this article should still give the reader and idea on the overall steps required to get started on the IaC and CI/CD process using terraform, Azure and Azure DevOps. As per usual, the code is available on my Github.
Last but not least, I am still happily learning on this subject and I am by no means a DevOps expert. So if there are some steps that can be done better or more efficiently please be sure to add in the comments below and let me know 🙂

You must be logged in to post a comment.